inbox-explainer Skill Bundle — 図解付き解説 HTML pipeline 完結セット
Wave 5-10 で確立した「Input → カテゴリ別 Before/After 解説 HTML → Cloudflare deploy → Discord 通知」の end-to-end skill pipeline を、Mac / Codex / 他 AI Agent から install してすぐ使える形に bundle 化。Skills 3 個 + Memory 4 件 + Docs / Prompts / Tools 含む。
TL;DR
- 3 skill cascade: inbox-explainer (master) + run-explainer-page (upstream) + run-ai-images (image engine)
- 環境別 install プロンプト: prompt_for_claude.md / prompt_for_codex.md / prompt_for_other_ai.md
- 5 domain template: ZK / メール / 論文 / 訪問 / Wave のいずれかを「
を explainer 化」で起動
01Bundle 全体構造 — 6 サブフォルダ
skills / memory / docs / prompts / tools / images の 6 領域。それぞれ用途が明確。
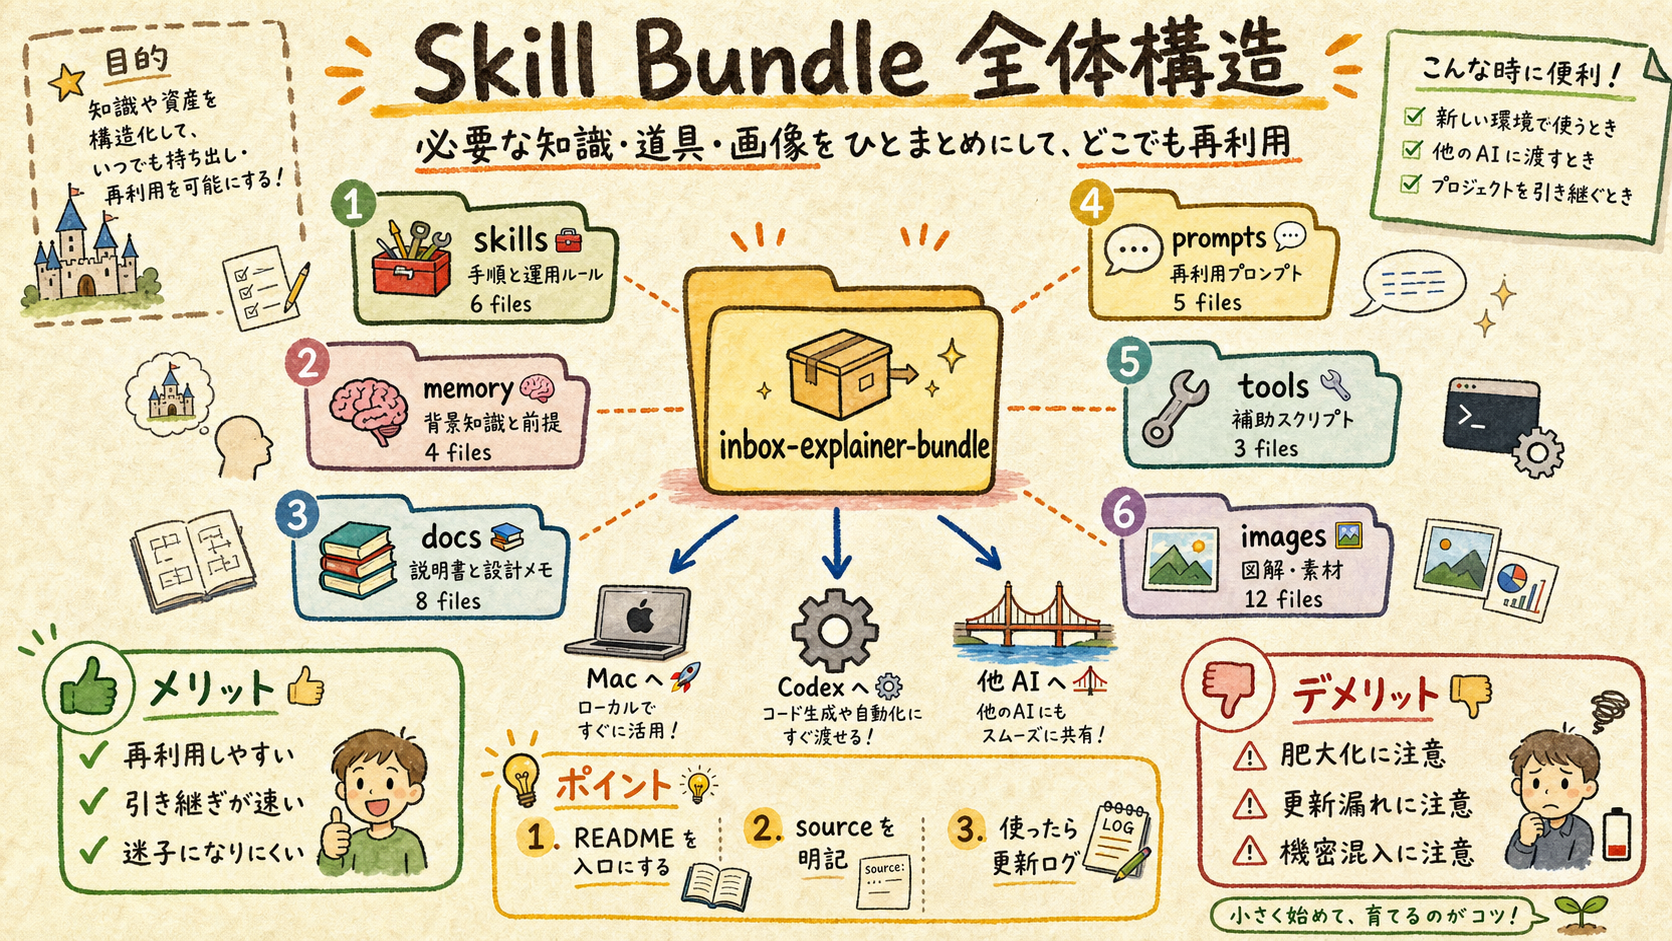
| フォルダ | 中身 | 用途 |
|---|---|---|
| skills/ | 3 skill (inbox-explainer / run-explainer-page / run-ai-images) | Claude Code skill 自動発動 |
| memory/ | 4 auto-memory (.md) | Wave 10 学び等を次セッションで自動適用 |
| docs/ | root cause 解析 (Wave 10 image gen) | 深い理解 + post-mortem |
| prompts/ | 3 prompt (claude / codex / other AI) | 環境別 install + 起動 |
| tools/ | Python script + Bash orchestrator | 5 phase pipeline 実行体 |
| images/ | 4 figures (この bundle 紹介 HTML 用) | 視覚化 |
📚 用語解説 — Skill Bundle: 関連する skill 群 + memory + docs + prompts + tools を 1 フォルダにまとめ、別環境 (Mac/Codex/他 AI) に持ち出して即使えるようにした完結配布パッケージ。Claude Code skill folder に install するだけで動作する設計。
🛠️ 運用方法: (1) bundle を任意の場所にコピー (cp -r) (2) 環境別 prompt (claude/codex/other) を読む (3) skills/ を install dir に配置 (4) memory/ を auto-memory dir に配置 + MEMORY.md に追記 (5) Claude Code 再起動で skill 一覧反映確認
⚠️ アンチパターン: skills だけコピーして memory/ を skip する → Wave 10 学び (stdin pipe pattern 等) が次セッションで適用されず再発失敗。READMEを読まずに install する → 環境別注意点 (Mac の codex.cmd 不要 / Codex 0.130+ flag 排他) を見落とす。
02Mac / Claude Code への install 手順
3 step で完了。skill 一覧に「inbox-explainer」が表示されれば成功。
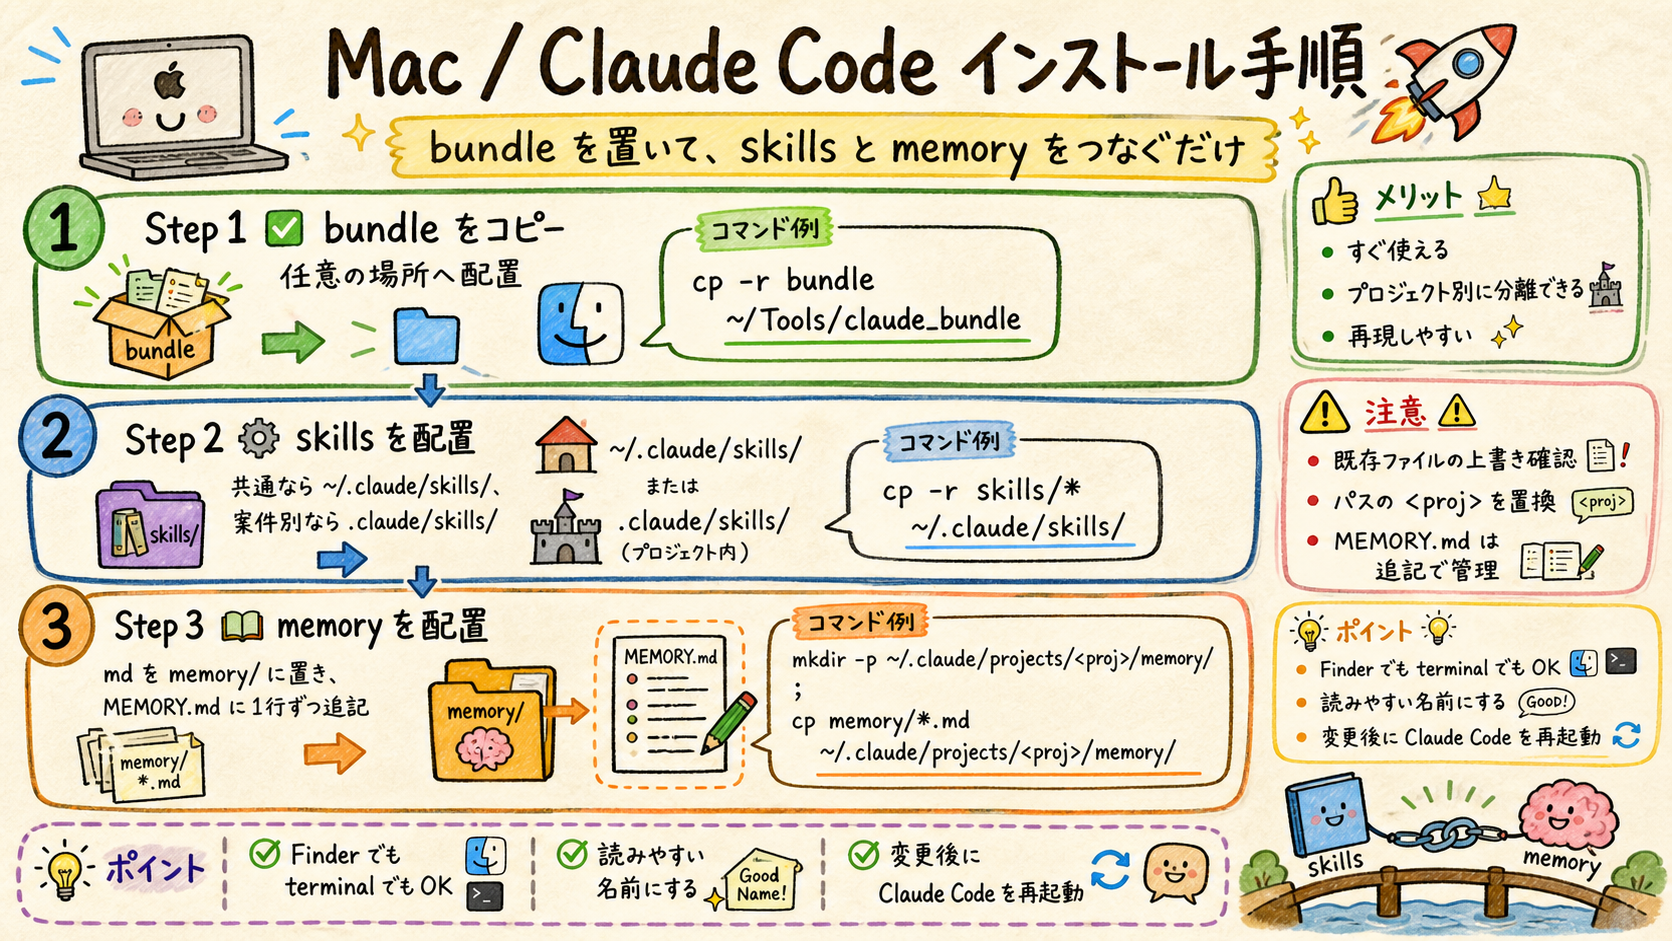
# Step 1: bundle 展開
cp -r /path/to/inbox-explainer-bundle ~/Documents/

# Step 2: skills を Claude Code 配下に配置
cp -r ~/Documents/inbox-explainer-bundle/skills/inbox-explainer ~/.claude/skills/
cp -r ~/Documents/inbox-explainer-bundle/skills/run-explainer-page ~/.claude/skills/
cp -r ~/Documents/inbox-explainer-bundle/skills/run-ai-images ~/.claude/skills/

# Step 3: memory を auto-memory に配置 + MEMORY.md 追記
cp ~/Documents/inbox-explainer-bundle/memory/*.md ~/.claude/projects/<your-project>/memory/
# 詳細は prompts/prompt_for_claude.md 参照
📚 用語解説 — auto-memory: Claude Code の永続記憶機構。~/.claude/projects/<proj>/memory/MEMORY.md をインデックス、各 entry は別 .md。次セッション開始時に自動 load される。
🛠️ 運用方法: (1) install 後 Claude Code 再起動 (2) skill 一覧 (`/skills` または system-reminder) に「inbox-explainer」表示確認 (3) 「BOOST を explainer 化」など trigger phrase で起動テスト (4) 完了後 Cloudflare URL が返る
⚠️ アンチパターン: project-local skill (.claude/skills/) と global (~/.claude/skills/) を両方に同名で置く → 衝突。どちらか 1 つ。global 推奨 (複数プロジェクトで再利用可能)。
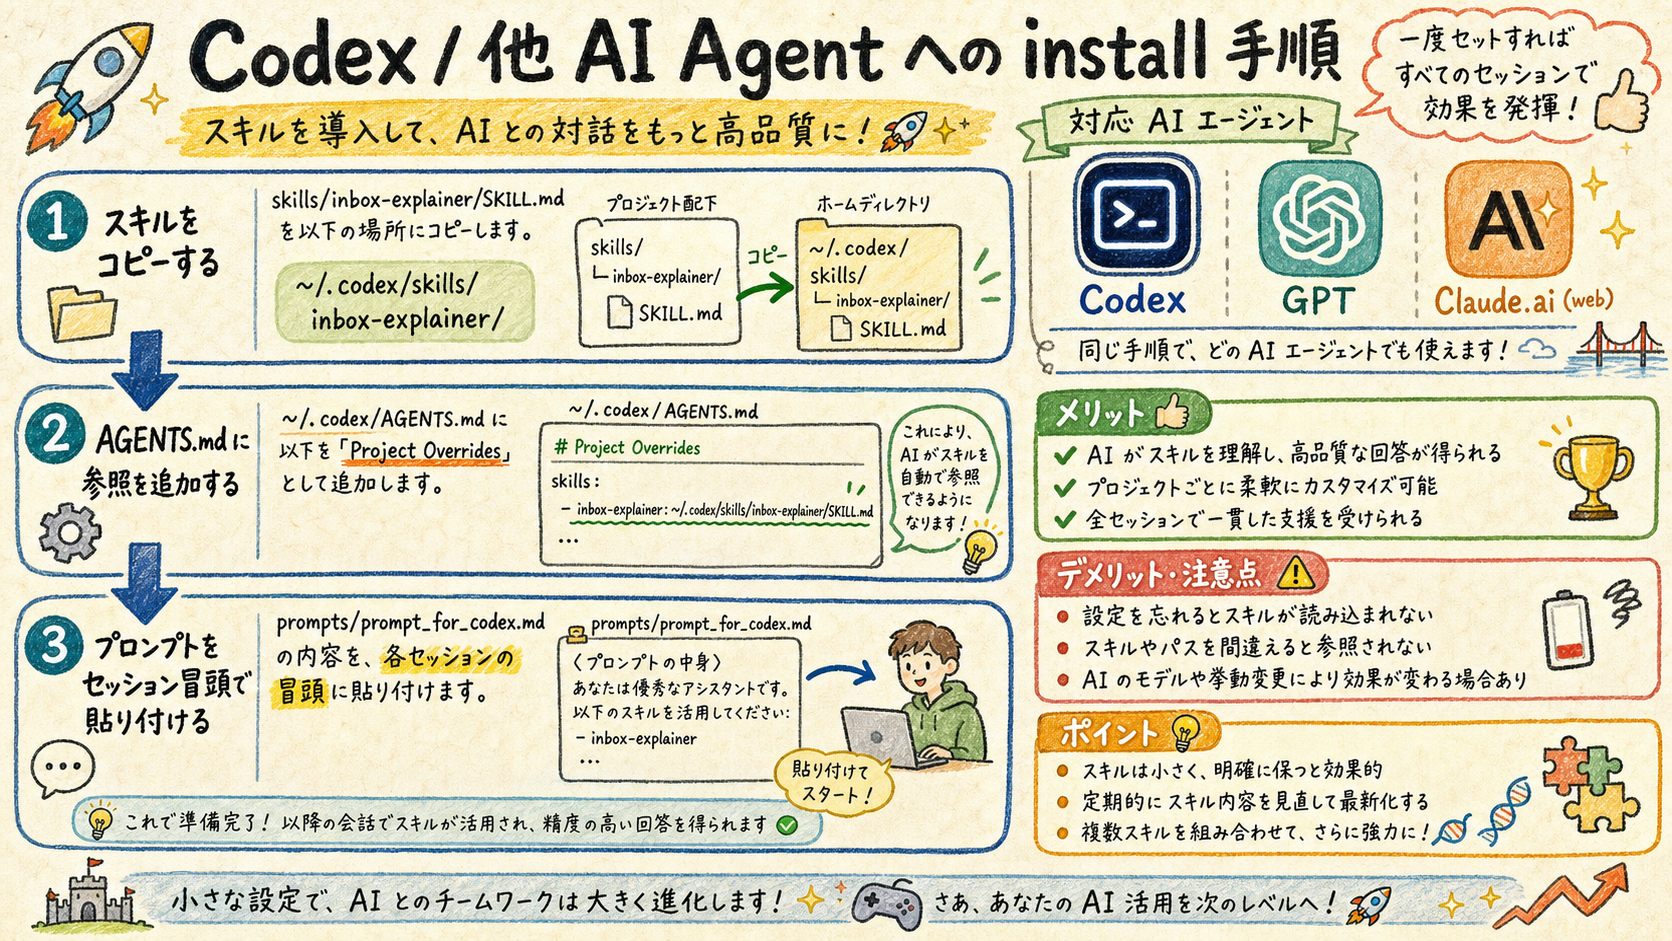
03Codex / 他 AI への install 手順
Codex は AGENTS.md 経由参照、他 AI は prompt 1 枚で workflow 再現。
| 環境 | install 方法 | 発動方法 |
|---|---|---|
| Codex CLI | skills/ を ~/.codex/skills/ にコピー + AGENTS.md に Project Override 追記 | セッション冒頭に prompt_for_codex.md 貼付 |
| ChatGPT web | (install 不可) | セッション冒頭に prompt_for_other_ai.md 全文貼付 |
| Gemini web | (install 不可) | 同上 |
| Claude.ai web | (install 不可、Artifacts のみ) | 同上 |
📚 用語解説 — AGENTS.md: Codex CLI が起動時に読む project-level の context file。~/.codex/AGENTS.md + 各 project の AGENTS.md を cascade で読む。Project Overrides セクションに skill path 追記すれば、Codex が認識する。
🛠️ 運用方法 (Codex): (1) cp -r skills/inbox-explainer ~/.codex/skills/ (2) ~/.codex/AGENTS.md に「inbox-explainer skill: ~/.codex/skills/inbox-explainer/SKILL.md」追記 (3) セッション冒頭に prompt_for_codex.md 貼付 (4) codex exec ... で動作テスト
🛠️ 運用方法 (他 AI): skill install 不可なため、prompt_for_other_ai.md 全文 + 自分の依頼を 1 つにまとめて貼付。outline.json + HTML を返してもらい、ブラウザで開く。
⚠️ アンチパターン: Codex で --full-auto と --dangerously-bypass-approvals-and-sandbox 両方つける → 0.130+ で排他エラー。bypass のみ使う。Mac の zsh で codex: command not found → npm global path を ~/.zshrc に追加。
045 Phase Pipeline 概要 — skill 内部の動き
「BOOST を explainer 化」と言うだけで自動で 5 段階を踏む。
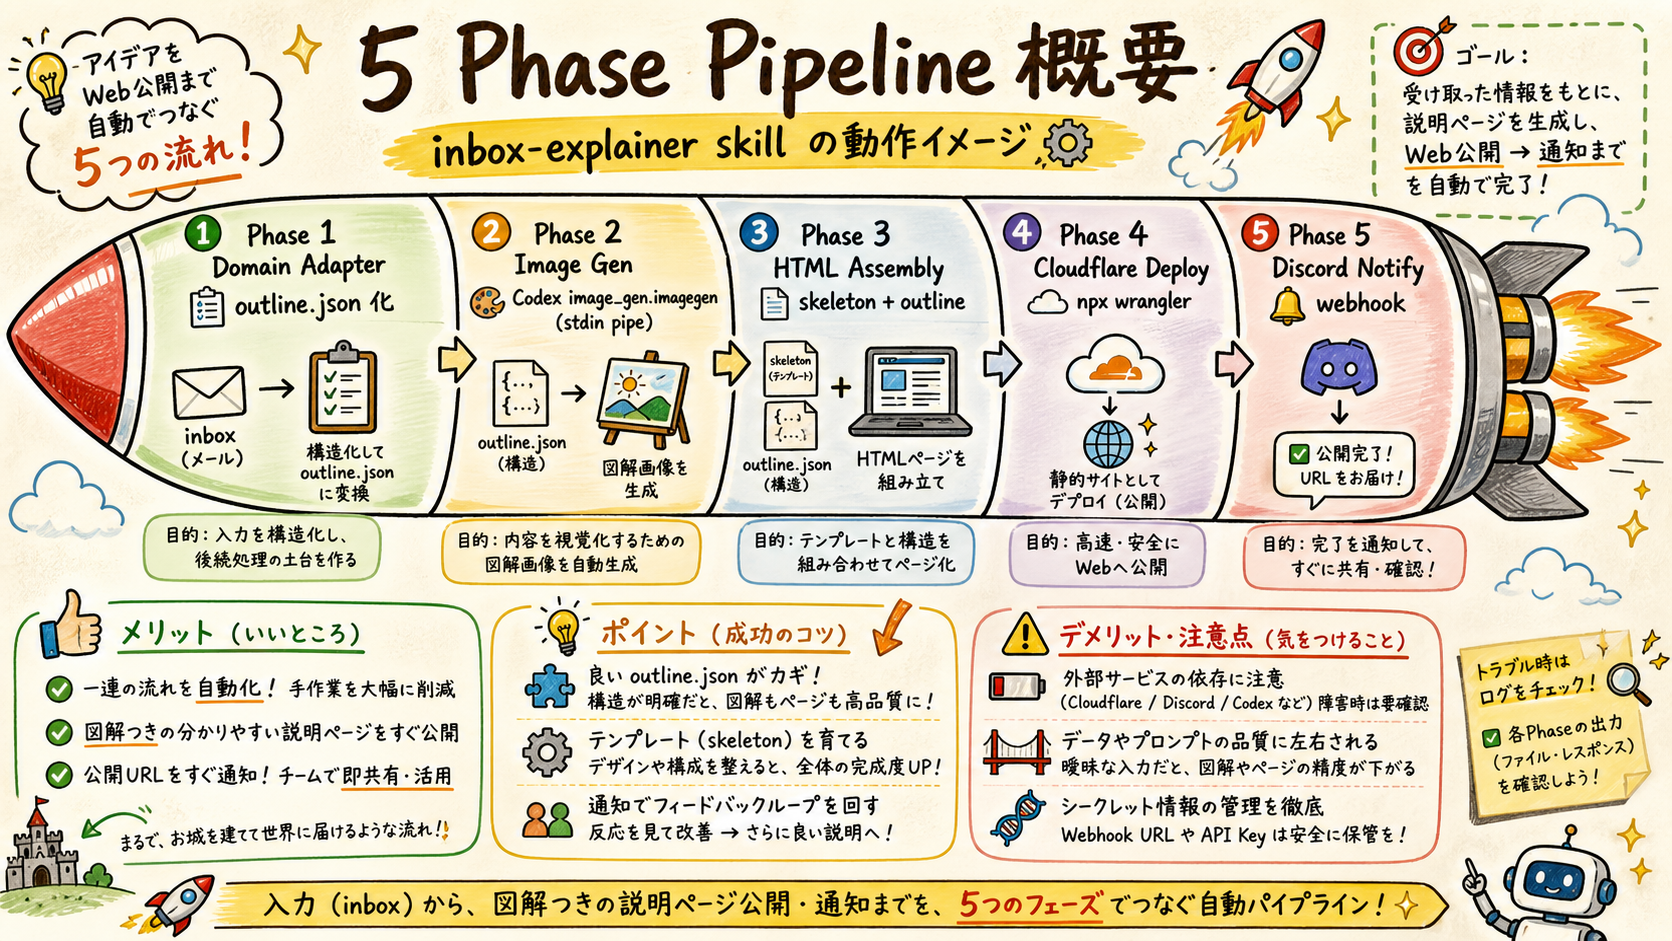
| # | Phase | Tool | Output |
|---|---|---|---|
| 1 | Domain Adapter | templates/domain_*.json | outline.json |
| 2 | Image Generation | Codex image_gen.imagegen (stdin pipe) | images/concept-NN-01.png × N |
| 3 | HTML Assembly | build_explainer_html.py + skeleton.html | index.html |
| 4 | Cloudflare Deploy | npx wrangler pages deploy | Production URL (https://<name>.pages.dev) |
| 5 | Discord Notify | curl + file-based payload | Discord embed (#claude-pc-bridge) |
📚 用語解説 — Codex stdin pipe (Wave 10 学び): Windows codex.cmd は argv 経由の長い日本語プロンプトを改行/特殊文字で truncate する。printf '%s' "$prompt" | codex exec - の形で stdin 渡しすれば argv 制限を完全回避。詳細: docs/260510_zk_wave10_image_gen_root_cause.md
🛠️ 運用方法: (1) trigger phrase を言う (2) 自動で 5 phase 実行 (3) 完了後 Cloudflare URL + Discord 通知が返る (4) ブラウザで開いて視覚確認 (5) iterate したい場合は --skip-deploy --skip-discord で local 確認
⚠️ アンチパターン: Phase 2 を skip して既存 PNG を流用 → 内容と figure の不整合。Phase 4 で .wrangler/cache/ を commit → account token 漏洩 (.gitignore に **/.wrangler/ 必須)。Phase 5 の payload を inline で送る → 日本語文字化け、必ず file-based -d @file.json。
結論
- 1 つの bundle で 3 環境 (Mac/Codex/他 AI) をカバー、skills + memory + prompts + tools + docs を完結配布。
- Wave 10 学び (Codex stdin pipe pattern) + Manager+Workers 体制 + 5 要素テンプレ を後続セッションで再現可能化。
- 5 domain (ZK/メール/論文/訪問/Wave) で日常の Input 系業務を 1 phrase で解説 HTML 化、Cloudflare で即共有可能。